kerasを動かしてみる~その2:CNN~
tensorflowをバックエンドで動かす
.keras/keras.jsonを以下のように書き換え
{
    "image_dim_ordering": "tf",
    "epsilon": 1e-07,
    "floatx": "float32",
    "backend": "tensorflow"
}
GPUで使う
pip install tensorflow-gpu
(TBD)
CNNのサンプル
GitHub - fchollet/keras: Deep Learning library for Python. Runs on TensorFlow, Theano, or CNTK.
cifar10
from keras.datasets import cifar10
- CIFAR-10は32x32ピクセルのカラー画像のデータセット
- クラスラベルはairplane, automobile, bird, cat, deer, dog, frog, horse, ship, truckの10種類
- 訓練用データ5万枚、テスト用データ1万枚
x_train shape: (50000, 32, 32, 3)
50000 train samples
10000 test samples
y_train shape: (50000, 1)
50000 train samples
10000 test samples
[3] ‘label -> ex: 3 ’
[ 0. 0. 0. 1. 0. 0. 0. 0. 0. 0.] one_hot
DataAugumentation
from keras.preprocessing.image import ImageDataGenerator
参考:画像の前処理 - Keras Documentation
keras-examples/test_datagen3.py at master · aidiary/keras-examples · GitHub
Keras Model
from keras.models import Sequential
from keras.layers import Dense, Dropout, Activation, Flatten
from keras.layers import Conv2D, MaxPooling2D
- Sequential : Sequentialモデル - Keras Documentation
- Conv2D : Convolutionalレイヤー - Keras Documentation
一層目のみinput_shape=x_train.shape[1:]のようにinput_shapeの指定がいる。
x_train shape: (50000, 32, 32, 3)の後ろ3つを取り出している。
モデルの保存・読み込み
from keras.models import load_model

model.save('my_model.h5')  # creates a HDF5 file 'my_model.h5'
del model  # deletes the existing model

# returns a compiled model
# identical to the previous one
model = load_model('my_model.h5')
参考:[TF]KerasでModelとParameterをLoad/Saveする方法 - Qiita
コード例
'''Train a simple deep CNN on the CIFAR10 small images dataset.
GPU run command with Theano backend (with TensorFlow, the GPU is automatically used):
    THEANO_FLAGS=mode=FAST_RUN,device=gpu,floatx=float32 python cifar10_cnn.py
It gets down to 0.65 test logloss in 25 epochs, and down to 0.55 after 50 epochs.
(it's still underfitting at that point, though).
'''

from __future__ import print_function
import keras
from keras.datasets import cifar10
from keras.preprocessing.image import ImageDataGenerator
from keras.models import Sequential
from keras.layers import Dense, Dropout, Activation, Flatten
from keras.layers import Conv2D, MaxPooling2D
from keras.models import load_model
import numpy as np


batch_size = 32
num_classes = 10
epochs = 2
data_augmentation = True

# The data, shuffled and split between train and test sets:
(x_train, y_train), (x_test, y_test) = cifar10.load_data()
print('x_train shape:', x_train.shape)
print(x_train.shape[0], 'train samples')
print(x_test.shape[0], 'test samples')
print('y_train shape:', y_train.shape)
print(y_train.shape[0], 'train samples')
print(y_test.shape[0], 'test samples')
print(y_test[0], 'label -> ex: 3 ')

# Convert class vectors to binary class matrices.
y_train = keras.utils.to_categorical(y_train, num_classes)
y_test = keras.utils.to_categorical(y_test, num_classes)
print(y_test[0], 'one_hot')

model = Sequential()

model.add(Conv2D(32, (3, 3), padding='same',
                 input_shape=x_train.shape[1:]))
model.add(Activation('relu'))
model.add(Conv2D(32, (3, 3)))
model.add(Activation('relu'))
model.add(MaxPooling2D(pool_size=(2, 2)))
model.add(Dropout(0.25))

model.add(Conv2D(64, (3, 3), padding='same'))
model.add(Activation('relu'))
model.add(Conv2D(64, (3, 3)))
model.add(Activation('relu'))
model.add(MaxPooling2D(pool_size=(2, 2)))
model.add(Dropout(0.25))

model.add(Flatten())
model.add(Dense(512))
model.add(Activation('relu'))
model.add(Dropout(0.5))
model.add(Dense(num_classes))
model.add(Activation('softmax'))

# initiate RMSprop optimizer
opt = keras.optimizers.rmsprop(lr=0.0001, decay=1e-6)

# Let's train the model using RMSprop
model.compile(loss='categorical_crossentropy',
              optimizer=opt,
              metrics=['accuracy'])

x_train = x_train.astype('float32')
x_test = x_test.astype('float32')
x_train /= 255
x_test /= 255

if not data_augmentation:
    print('Not using data augmentation.')
    model.fit(x_train, y_train,
              batch_size=batch_size,
              epochs=epochs,
              validation_data=(x_test, y_test),
              shuffle=True)
else:
    print('Using real-time data augmentation.')
    # This will do preprocessing and realtime data augmentation:
    datagen = ImageDataGenerator(
        featurewise_center=False,  # set input mean to 0 over the dataset
        samplewise_center=False,  # set each sample mean to 0
        featurewise_std_normalization=False,  # divide inputs by std of the dataset
        samplewise_std_normalization=False,  # divide each input by its std
        zca_whitening=False,  # apply ZCA whitening
        rotation_range=0,  # randomly rotate images in the range (degrees, 0 to 180)
        width_shift_range=0.1,  # randomly shift images horizontally (fraction of total width)
        height_shift_range=0.1,  # randomly shift images vertically (fraction of total height)
        horizontal_flip=True,  # randomly flip images
        vertical_flip=False)  # randomly flip images

    # Compute quantities required for feature-wise normalization
    # (std, mean, and principal components if ZCA whitening is applied).
    datagen.fit(x_train)

    # Fit the model on the batches generated by datagen.flow().
    model.fit_generator(datagen.flow(x_train, y_train,
                                     batch_size=batch_size),
                        steps_per_epoch=x_train.shape[0] // batch_size,
                        epochs=epochs,
validation_data=(x_test, y_test))

"""
# save the model
model.save('./model.hdf5')
"""

"""
# load model
model = load_model('model.hdf5')

#loss, acc = model.evaluate(x_test, y_test, verbose=0)
#print('Test loss:', loss)
#print('Test acc:', acc)

# only one test
x_test = x_test[0].reshape(1, 32, 32, 3)
print(model.predict(x_test))

# predict
result = model.predict(x_test)
print(np.argmax(result))
"""
配列の入れ替え
shape: (1,2,3,4) -> (1,4,2,3)
データ構造
keras -> train shape: (50000, 32, 32, 3)
chainer -> train shape: (50000, 3, 32, 32)
import numpy as np

x = np.arange(4*6).reshape(1,2,3,4)
print x.shape

x = np.swapaxes(x,1,3)
y = np.swapaxes(x,1,2)
print y.shape
参考:
画像読み込み、表示のお勉強
例えばros kinect のdepth imageは
Data published on /camera/depth/image_raw is the depth in millimeters as a 16 bit unsigned integer.
のようにパブされている。
[PARTLY UNSOLVED] Raw Kinect Depth Data - ROS Answers: Open Source Q&A Forum
グレースケール16bit画像の読み込み
python - OpenCV - Reading a 16 bit grayscale image - Stack Overflow
OpenCV
#! /usr/bin/env python

import sys
import numpy
import cv2

filename = sys.argv[1]
im = cv2.imread(filename, flags = 2)  # そのまま読み込み
#im = cv2.imread(filename, flags = -1)

imgArray = numpy.asarray(im)

print imgArray
画像とビデオの読み込みと書き込み — opencv v2.1 documentation
Pillow
16bitから8bit画像へ変換
#! /usr/bin/env python

from PIL import Image
import sys
import numpy


filename = sys.argv[1]

im = Image.open(filename)
table=[ i/256 for i in range(65536) ]

im2 = im.point(table,'L')

imgArray1 = numpy.asarray(im)
imgArray2 = numpy.asarray(im2)

print imgArray1
print imgArray2
[SOLVED] PIL convert 16bit grayscale to 8 bit
表示
opencvのimshowで画像が表示されないことがある。以下参考。
機械学習のお勉強(ChainerCV)
ChainerCV↓
コード
GitHub - chainer/chainercv: ChainerCV: a Library for Computer Vision in Deep Learning
ドキュメント
ChainerCV — ChainerCV 0.2.1 documentation
Detection Models
- Faster R-CNN
- Single Shot Multibox Detector (SSD)
Semantic Segmentation
- SegNet
が実装されている。
コードを読んで理解を深めたい。
機械学習のお勉強(SVM,ニューラルネット、CNN、FCN,YOLO,SegNet etc ...)~参考まとめ~
keras2とchainerが使いやすそう
SVM
SVM、ニューラルネットなどに共通する分類問題における考え方 - HELLO CYBERNETICS
http://home.hiroshima-u.ac.jp/tkurita/lecture/svm.pdf
http://www.ism.ac.jp/~fukumizu/ISM_lecture_2006/svm-ism.pdf
NN
PFN発のディープラーニングフレームワークchainerで画像分類をするよ(chainerでニューラルネット1) - 人工言語処理入門
chainerでニューラルネットを学んでみるよ(chainerでニューラルネット2) - 人工言語処理入門
CNN
Convolutional Neural Networkを実装する - Qiita
AlexNet
【深層学習】畳み込みニューラルネットで画像分類 [DW 4日目] - Qiita
VGG
ディープラーニングの様々なモデルを使ってCIFAR-10画像データセットの分類を行う - Qiita
FCN
memo: Fully Convolutional Networks 〜 Chainerによる実装 〜
chainerに復帰したくてFCN実装した - MATHGRAM
GitHub - wkentaro/fcn: Chainer Implementation of Fully Convolutional Networks.
memo: Fully Convolutional Networks 〜 Chainerによる実装 再考1 〜
YOLO
ペンパイナッポーとアッポーペンを識別する(ChainerでYOLO ver2) - Qiita
GitHub - ashitani/YOLO_chainer: chainer implementation of YOLO
GitHub - leetenki/YOLOtiny_v2_chainer: YOLOtiny v2をchainerに移植したもの
GitHub - leetenki/YOLOv2: YOLOv2のchainerの再現実装です(darknetのchainerローダと、完全なchainer上での訓練コードを含みます)
SSD
物体検出アルゴリズム(SSD : Single Shot MultiBox Detector)を学習させてみる - Qiita
SSD: Single Shot MultiBox Detector 高速リアルタイム物体検出デモをKerasで試す - Qiita
SSDによる物体検出を試してみた - TadaoYamaokaの日記
SegNet
GitHub - pfnet-research/chainer-segnet: SegNet implementation & experiments in Chainer
SegNetのモデルは簡単だがエラーが出て動かず - mabonki0725の日記
[Survey]Learning to Segment Object Candidates - Qiita
keras-segnet/model.png at master · imlab-uiip/keras-segnet · GitHub
segnet/segnet.py at master · preddy5/segnet · GitHub
GitHub - 0bserver07/Keras-SegNet-Basic: SegNet-Basic with Keras
GitHub - legokichi/keras-segnet
3D-CNN
chainer sample
Chainerのサンプルコードを集めてみた(メモ) - あおのたすのブログ
Fine-tuning
Chainerでfine-tuningを行う - Qiita
Chainerでファインチューニングするときの個人的ベストプラクティス - Qiita
VGG16のFine-tuningによる犬猫認識 (1) - 人工知能に関する断創録
インデックスカラー
The PASCAL Visual Object Classes Challenge 2012 (VOC2012)
PASCALのセグメンテーションデータはインデックスカラー(.png)で作られている。
なので、以下のように呼びだせば、例えば人ならば15という値で取り出すことができる。

import numpy as np
from PIL import Image
import csv

path = '2007_000129.png'
img = Image.open(path)

img_array = np.asarray(img, dtype=np.int32)
mask = img_array == 255
img_array[mask] = -1

with open('file.csv', 'wt') as f:
    writer = csv.writer(f)
    writer.writerows(img_array)
左上の配列はこのようになっている。-1はchainerではクラスから無視されるため境界の白色は-1に変換している。

ImageMagick で PNG の形式を変換 - awm-Tech
「画像変換101」#2: ダイレクトカラー画像とインデックスカラー画像 | OPTPiX Labs Blog
chainerに復帰したくてFCN実装した - MATHGRAM
画像のセグメンテーション
K-Means クラスタリングを使った色ベースのセグメンテーション - MATLAB & Simulink Example - MathWorks 日本
kmeans を使った画像のセグメンテーション - Qiita
参考:
【機械学習】ディープラーニング フレームワークChainerを試しながら解説してみる。 - Qiita
http://www.vision.cs.chubu.ac.jp/flabresearcharchive/bachelor/B13/Paper/fukui.pdf
https://www.morikita.co.jp/data/mkj/084921mkj.pdf
サルでもわかるディープラーニング入門 (2017年) (In Japanese)
Chainerによる畳み込みニューラルネットワークの実装 - 人工知能に関する断創録
chainerの畳み込みニューラルネットワークで10種類の画像を識別(CIFAR-10) - AI-Programming
chainer初心者が畳み込みニューラルネット試してみた - 技術系メモ
http://static.googleusercontent.com/media/research.google.com/ja//pubs/archive/42237.pdf
【初めて使う人向け】Chainerでニューラルネットを学習する手順を整理してみた | 自調自考の旅
Chainer 1.11.0 で畳み込みニューラルネットワークを試してみる - Gunosyデータ分析ブログ
Convolutional Neural Networkを実装する - Qiita
Chainerによる畳み込みニューラルネットワークの実装 - 人工知能に関する断創録
chainerのサンプルコードを集めてみた(チュートリアルも追加) - studylog/北の雲
CNNの学習に最高の性能を示す最適化手法はどれか - 俺とプログラミング
Chainerを使って畳み込みを実装する | JProgramer
怪我をしても歩ける6足歩行ロボットの学習 | Preferred Research
深層強化学習ライブラリChainerRL | Preferred Research
Convolutional Neural Networkとは何なのか - Qiita
定番のConvolutional Neural Networkをゼロから理解する - DeepAge
http://www.nlab.ci.i.u-tokyo.ac.jp/pdf/20150717SP.pdf
http://www.nlab.ci.i.u-tokyo.ac.jp/pdf/CNN_survey.pdf
RGBDデータセットのお勉強
- INDOOR
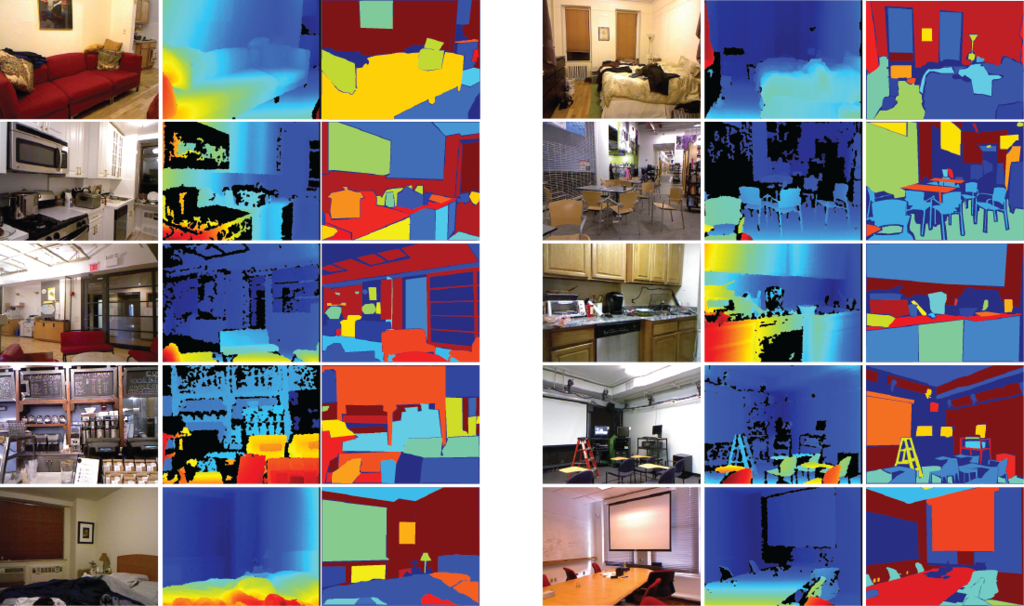
- NYU Dataset v1 ☆
- NYU Dataset v2 ☆
- SUN 3D ☆
- SUN RGB-D ☆
- ViDRILO: The Visual and Depth Robot Indoor Localization with Objects information dataset ☆
- SceneNN: A Scene Meshes Dataset with aNNotations ☆
- Stanford 2D-3D-Semantics Dataset ☆
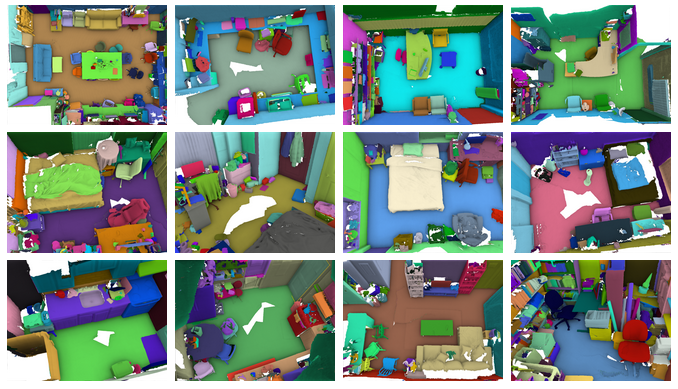
- ScanNet ☆
- SceneNet RGB-D ☆
- SUNCG ☆
- ‘Object Detection and Classification from Large-Scale Cluttered Indoor Scans’
- Cornell-RGBD-Dataset
- Active Vision Dataset (AVD)
- RGB-D Semantic Segmentation Dataset
- RGBD Scenes dataset v2
- Object Disappearance for Object Discovery
- OUTDOOR
Gruond Truthとは : 正確さや整合性をチェックするためのデータ。各部分の真のカテゴリー。
【 所感 】
- NYU Dataset
- SUN 系
- ScanNet 系
がSemanticSegmentation x Indoorのデータセットとして良さそう。
http://www.cs.toronto.edu/~urtasun/courses/CSC2541/08_instance.pdf
360度でのデータセットという意味で、
- Stanford 2D-3D-Semantics Dataset
がすごかった。
以下、要チェックなものに☆マーク。
INDOOR
NYU Dataset v1 ☆
Around 51,000 RGBD frames from indoor scenes such as bedrooms and living rooms.

NYU Depth V1 « Nathan Silberman
NYU Dataset v2 ☆
~408,000 RGBD images from 464 indoor scenes, of a somewhat larger diversity than NYU v1. Per-frame accelerometer data.
NYU Depth V2 « Nathan Silberman
SUN 3D ☆
Labelling: Polygons of semantic class and instance labels on frames propagated through video.
インスタンスを色で分けている
SUN RGB-D ☆
Introduced: CVPR 2015
Device: Kinect v1, Kinect v2, Intel RealSense and Asus Xtion Live Pro
Description: New images, plus images taken from NYUv2, B3DO and SUN3D. All of indoor scenes.
Labelling: 10,335 images with polygon annotation, and 3D bounding boxes around objects
The dataset contains RGB-D images from NYU depth v2 [1], Berkeley B3DO [2], and SUN3D [3]. Besides this paper, you are required to also cite the following papers if you use this dataset.
SUN RGB-D: A RGB-D Scene Understanding Benchmark Suite
ViDRILO: The Visual and Depth Robot Indoor Localization with Objects information dataset ☆
Introduced: IJRR 2015
Device: Kinect v1
Description: Five sequences (total 22454 frames) captured from a robot moving through an office environment
Labelling: Scene type of each frame, plus presence/absence of each of a set of 15 objects.
SceneNN: A Scene Meshes Dataset with aNNotations ☆
We introduce an RGB-D scene dataset consisting of more than 100 indoor scenes. Our scenes are captured at various places, e.g., offices, dormitory, classrooms, pantry, etc., from University of Massachusetts Boston and Singapore University of Technology and Design.
SceneNN: A Scene Meshes Dataset with aNNotations

Stanford 2D-3D-Semantics Dataset ☆
これすごい…
Device: Matterport Camera (360 degree rotation RGBD sensor)
Description: 360 degree RGBD images captured from 6 large areas in municipal buildings, together with mesh and point cloud reconstructions.
Labelling: Semantic labelling on the mesh (13 classes, plus instance labels), and 3D volumentric reconstruction labels

ScanNet ☆
Description: 2.5 million frames from 1513 scenes
Labelling: Automatically computed (and human verified) camera poses and surface reconstructions. Instance and semantic segmentations provided on reconstructed mesh. 3D CAD models + alignment also provided for each scene.
ScanNet: Richly-annotated 3D Reconstructions of Indoor Scenes (CVPR 2017 Spotlight) - YouTube
SceneNet RGB-D ☆
Description: 5 million images rendered of 16,895 indoor scenes. Room configuration randomly generated with physics simulator.
Labelling: Camera pose, plus per-pixel instance, class labelling and optical flow.
SceneNet RGB-D: Photorealistic Rendering of 5M Images with Perfect Ground Truth
SUNCG ☆
Description: 45,622 scenes with manually created room and furniture layouts. Images can be rendered from the geometry, but are not provided by default.
Labelling: Object semantic class and instance labelling.

‘Object Detection and Classification from Large-Scale Cluttered Indoor Scans’
Cornell-RGBD-Dataset
Scene Understanding for Personal Robots
Active Vision Dataset (AVD)
Description: Dense sampling of images in home and office scenes, captured from a robot. Dataset designed for simulation of motion and instance detection.
Labelling: Per-frame camera pose, object instance bounding boxes, movement pointers between images.
RGB-D Semantic Segmentation Dataset
.ply: the 3D mesh; can be viewed by means of , e.g., MeshLab.
RGBD Scenes dataset v2
Description: A second set of real indoor scenes featuring objects from the RGBD object dataset.
Object Disappearance for Object Discovery
Papers/IROS2012_Mason_Marthi_Parr - ROS Wiki
OUTDOOR
KITTI
The KITTI Vision Benchmark Suite
CITYSCAPES
Volume
- 5 000 annotated images with fine annotations
- 20 000 annotated images with coarse annotations

ROS message_filtersのお勉強
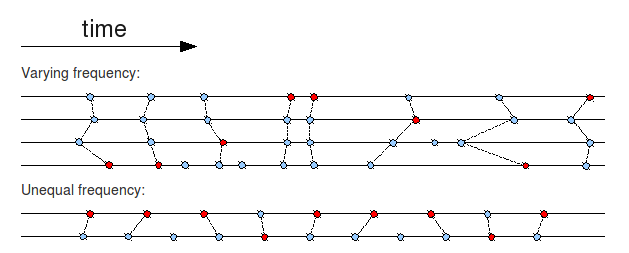
複数のトピックの時間の同期を取りたいときなどに使用する。
Time Synchronizer
- imageとcamera_infoの同期をとっている
The TimeSynchronizer filter synchronizes incoming channels by the timestamps contained in their headers, and outputs them in the form of a single callback that takes the same number of channels. The C++ implementation can synchronize up to 9 channels.
import message_filters
from sensor_msgs.msg import Image, CameraInfo

def callback(image, camera_info):
  # Solve all of perception here...

image_sub = message_filters.Subscriber('image', Image)
info_sub = message_filters.Subscriber('camera_info', CameraInfo)

ts = message_filters.TimeSynchronizer([image_sub, info_sub], 10)
ts.registerCallback(callback)
rospy.spin()
#include <message_filters/subscriber.h>
#include <message_filters/time_synchronizer.h>
#include <sensor_msgs/Image.h>
#include <sensor_msgs/CameraInfo.h>

using namespace sensor_msgs;
using namespace message_filters;

void callback(const ImageConstPtr& image, const CameraInfoConstPtr& cam_info)
{
  // Solve all of perception here...
}

int main(int argc, char** argv)
{
  ros::init(argc, argv, "vision_node");

  ros::NodeHandle nh;

  message_filters::Subscriber<Image> image_sub(nh, "image", 1);
  message_filters::Subscriber<CameraInfo> info_sub(nh, "camera_info", 1);
  TimeSynchronizer<Image, CameraInfo> sync(image_sub, info_sub, 10);
  sync.registerCallback(boost::bind(&callback, _1, _2));

  ros::spin();

  return 0;
}
ApproximateTime Policy
The message_filters::sync_policies::ApproximateTime policy uses an adaptive algorithm to match messages based on their timestamp.
import message_filters
from std_msgs.msg import Int32, Float32

def callback(mode, penalty):
  # The callback processing the pairs of numbers that arrived at approximately the same time

mode_sub = message_filters.Subscriber('mode', Int32)
penalty_sub = message_filters.Subscriber('penalty', Float32)

ts = message_filters.ApproximateTimeSynchronizer([mode_sub, penalty_sub], 10, 0.1, allow_headerless=True)
ts.registerCallback(callback)
rospy.spin()
#include <message_filters/subscriber.h>
#include <message_filters/synchronizer.h>
#include <message_filters/sync_policies/approximate_time.h>
#include <sensor_msgs/Image.h>

using namespace sensor_msgs;
using namespace message_filters;

void callback(const ImageConstPtr& image1, const ImageConstPtr& image2)
{
  // Solve all of perception here...
}

int main(int argc, char** argv)
{
  ros::init(argc, argv, "vision_node");

  ros::NodeHandle nh;
  message_filters::Subscriber<Image> image1_sub(nh, "image1", 1);
  message_filters::Subscriber<Image> image2_sub(nh, "image2", 1);

  typedef sync_policies::ApproximateTime<Image, Image> MySyncPolicy;
  // ApproximateTime takes a queue size as its constructor argument, hence MySyncPolicy(10)
  Synchronizer<MySyncPolicy> sync(MySyncPolicy(10), image1_sub, image2_sub);
  sync.registerCallback(boost::bind(&callback, _1, _2));

  ros::spin();

  return 0;
}

参考:
http://wiki.ros.org/message_filters
message_filtersでタイムスタンプがおおよそ一致した際にコールバックさせる方法 - ゼロから始めるロボットプログラミング入門講座
フィルタのお勉強
- Finite Impulse Resposeフィルタ(移動平均)
- Infinite Impulse Responseフィルタ
- 双2次フィルタ
- 逆フーリエ&ローパス
- カルマンフィルタ
- すごくわかりやすい資料
Finite Impulse Resposeフィルタ(移動平均)
y[n] = 1/2 * (x[n] + x[n-1])
Infinite Impulse Responseフィルタ
例:ローパスフィルタ
y[n] = r*x[n] + (1-r)*y[n-1]
yが出力、xが入力、rは係数。
参考:ディジタル制御の基礎
双2次フィルタ
以下の式の係数を調整するだけで、ハイパスやローパスなど様々なフィルタを作成できて便利。
y[n] = (b0/a0)*x[n] + (b1/a0)*x[n-1] + (b2/a0)*x[n-2]
                        - (a1/a0)*y[n-1] - (a2/a0)*y[n-2
yが出力、xが入力、a,bは係数。
で説明してくださっている。
逆フーリエ&ローパス
【NumPy】高速逆フーリエ変換とローパスフィルタでノイズ除去
カルマンフィルタ
シンプルなモデルとイラストでカルマンフィルタを直感的に理解してみる - Qiita
すごくわかりやすい資料
参考:
Python NumPy SciPy : デジタルフィルタ(ローパスフィルタ)による波形整形 | org-技術
【NumPy】高速逆フーリエ変換とローパスフィルタでノイズ除去
http://android.ohwada.jp/archives/334
http://www.mech.tohoku-gakuin.ac.jp/rde/contents/sendai/mechatro/archive/RMSeminar_No07_s8.pdf